
Writing Web Server Applications with QtWebApp
This tutorial teaches you how to develop HTTP webserver applications in C++ with Qt and QtWebApp. You have to know the basics of C++ and HTML already.
You can download the current Qt SDK here, and the latest QtWebApp library is always here.
Introduction into the Qt SDK
The introduction teaches how to use the development environment and explains some important features of Qt. If you have already developed Qt console applications, you may skip this section.
Software Installation and Test
Please download and install the current Qt SDK, which contains the integrated development environment (IDE) Qt Creator, Qt runtime libraries and in case of Windows a C++ compiler. Linux users have to install some additional packages from their Linux distribution:
| Debian, Ubuntu, Mint | sudo apt install build-essential gdb libgl1-mesa-dev |
|---|---|
| Fedora, RedHat, CentOS | sudo yum groupinstall "C Development Tools and Libraries" sudo yum install mesa-libGL-devel |
| SUSE | sudo zypper install -t pattern devel_basis |
Create a directory for your programming projects, then download and extract the QtWebApp ZIP file there. Start the QT Creator IDE and open the project file Demo1/Demo1.pro. This opens the "Configure Project" dialog:

You can simply click on the highlighted "Configure Project" button. Then click the green "Run" button in the left border to build and run the demo program. While your computer is busy, you might watch the "Compile Output" pane by clicking the related button in the bottom border. If everything works fine, a console/terminal window opens, telling which configuration file the demo application is using:

Open the URL http://localhost:8080 in your favorite web browser to check whether the demo web server is working:

All required software is working properly if you see that website on your screen. You may close the demo application now.
Creating a New Project
Use the menu File/New to create a new project of type "Qt Console Application":

If you cannot find this template, check the selection in the upper right corner. It has to be "Desktop Templates".
Enter a name for your project (e.g. "MyFirstWebApp") and select the directory that you created for your programming projects. The next dialog box displays kits for the target operating system. Just click on the "Next" button here:

If you have version control software installed, then you can now select whether this project shall be put under version control. Select whatever you want here. I will not cover version control in this tutorial.
Qt Creator creates a raw main.cpp file in which you do now insert the "Hello World" line:
#include <QCoreApplication>

int main(int argc, char *argv[])
{
    QCoreApplication a(argc, argv);
    qDebug("Hello World");
    return a.exec();
}
Click the green "Run" button in the left border to build and run the hello-world program.

Now lets take a look at the automatically generated project file MyFirstWebApp.pro. If you are using another Qt version, your file may look slightly different:
QT += core
QT -= gui

TARGET = MyFirstWebApp

CONFIG += console
CONFIG -= app_bundle

TEMPLATE = app

SOURCES += main.cpp
All possible settings are described here.
The QT variable specifies which Qt modules your application uses. Our project file adds the "core" module and removes the "gui" module which would be active by default otherwise.
The core module is always required. Since we will only output text, we don't need the gui module.
The core module is provided by the runtime library libQt5Core.so (Linux) or Qt5Core.dll (Windows). The gui module is provided by libQt5Gui.so or Qt5Gui.dll, which we don't need. Each module has a related runtime library.
If you are unsure which features you have to select, then take a look at the documentation of each class that you are using. The documentation of the QCoreApplication class tells that we have to add "core" to the QT variable.
The TARGET variable specifies the name of the executable file. So on Linux it will be "MyFirstWebApp" and on Windows it will be "MyFirstWebApp.exe".
The CONFIG variable sets configuration options for the build tools. In our case, we add "console" to be able to output text in the console window. The Mac OS specific option "app_bundle" is deactivated here, so Qt does not create an application bundle.
The TEMPLATE variable can be either "app" or "lib". Since we are developing an application, it's correctly set to "app". When creating a shared library, we would use the value "lib" instead.
The last variable SOURCES specifies the *.cpp files of your project. You will also add *.h files to the HEADERS variable later. But for the moment we don't have any header file in our project.
Multiple filenames are separated by space or by backslash plus line-break. For example:
SOURCES = file1.cpp file2.cpp file3.cpp

HEADERS = file1.h \
          file2.h \
          file3.h
I'm of the opinion that source files belong into a sub-directory with the name "src". So use the file manager of your operating system now to create a "src" folder, then move the file main.cpp into it. After that, you have to update the project file with the new location of the main.cpp file:
SOURCES += src/main.cpp
Use always a forward slash for directory names! Backward slashes have a different meaning to Qt as explained above. Press Ctrl-S to save the file, then wait one or two seconds until Qt Creator re-reads it and refreshes the screen.
Debugging
Now I like to introduce you in debugging. First enter some faulty code:
#include <QString>;

int main(int argc, char *argv[])
{
    qDebug("start");

    QString* str;
    str->append("test");
    qDebug(str->toLatin1());

    qDebug("end");
}
Experienced programmers might notice that the included file name is "QString", not "qstring.h". This is the special style of the Qt SDK. Actually, the QString is an alias for qstring.h, but that might change in future. Use "QString" as the API Documentation tells, then you will encounter less problems with future Qt releases.
When you run this application, you will see the "start" message in the console window but the "end" message is missing. So something does not work obviously. And the problem cause is not the unusual include line - trust me.
Open the "Application Output" window by clicking on the related button in the bottom border. There you will see the following messages:

The message "MyFirstWebApp crashed" is a good hint to the problem cause. For some reason, the operating system terminated the program abnormally. But it does not tell us where the problem cause is.
Click the second "Run" button in the left border, the one with the bug on it. This runs the application with a debugger attached. The debugger will show where it crashed:

The debugger pops up the more detailed error message "Segmentation fault" which means that the program tried to access an area of memory that does not belong to the program. If available, then the debugger also opens the source code file where the error happened, which is qstring.h.
However, lets assume that errors are mostly in our own source code - not in the Qt libraries. A look into the bottom area shows that qstring.h was called by main.cpp line 8. Click on that to open the main file.

Here we see that variable "str" is not accessible. That means the pointer "str" points to an invalid location in memory. Some code must be missing that assigns a proper value to the pointer. The pointer has actually an undefined random value.
If you want to inspect the pointer anyway, then click onto "str" in the right panel with the right mouse button, then move the mouse cursor over the command "Open Memory Editor":

In this case, the random value is 0xb749f379.
Now lets fix the broken line:
QString* str=new QString();
The program runs properly now. The console window shows the "start" message, the content of the variable str and finally the "end" message.
Now lets replace the whole program source code by another faulty one to try another feature of the debugger:
#include <QtGlobal>

int main(int argc, char *argv[])
{
    qDebug("start");

    int counter=0;
    while (counter<100) {
        counter+1;
    }
    qDebug("The result is %i", counter);

    qDebug("end");
}
Since we don't use the QString class anymore, I removed the related include statement. But for the qDebug() function, we now have to include the file "QtGlobal". The related API Documentation is difficult to find by the search engine. Book-mark this website and check it whenever you search for a Qt function or constant that is not a class member. qDebug() is just one of them.
Run this program by clicking the first green "Run" button in the left border. The console window will open as usual and you can see the "start" message there. But then nothing else happens. The program does not reach it's end and you might notice that one CPU core remains 100% busy all the time.
Close the console window and restart it with the debugger attached. The program will hang again as
before. But you can now click on the Interrupt button  :
:
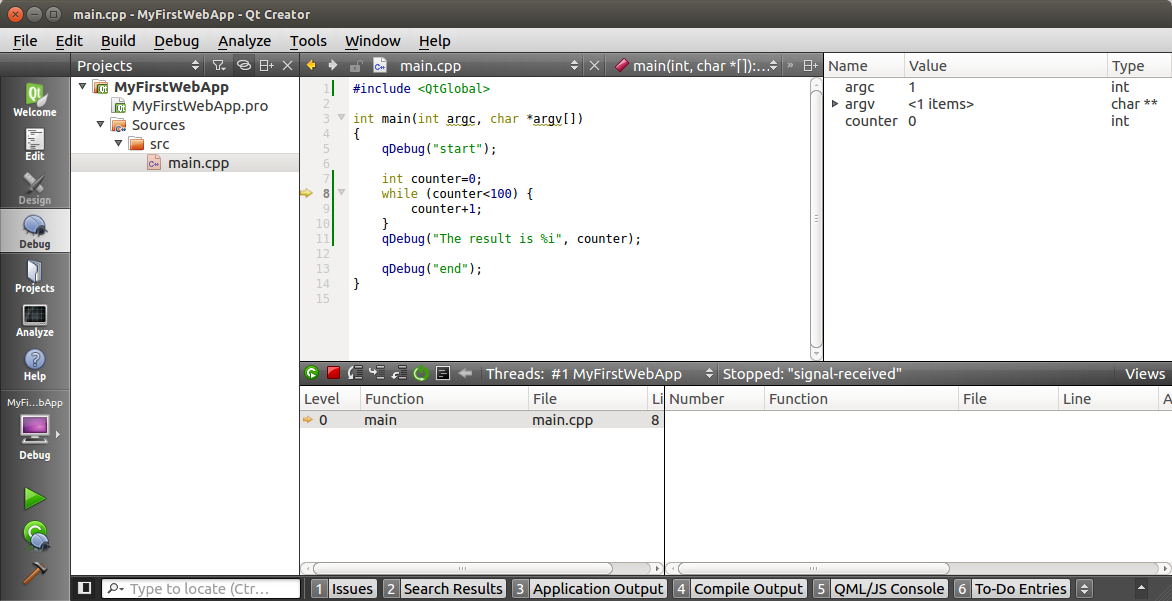
The debugger shows that you interrupted the execution at line 8 of main.cpp. On the right side you can see that the counter variable still has the value 0. It was not incremented as planned. And because the counter is always 0, the "while" loop repeats forever.
So the command "counter+1" in the loop does not work properly. It should be "counter=counter+1". But instead of fixing it, I like to show you something else first.
Stop the Program. Click with the right mouse button on the line number 5 to set a breakpoint on that line:

Then run the program with the debugger attached. It will pause at line 5. The console window is empty because the "start" message is not yet written out. Press F10 repeatedly to execute the program line by line. You will notice that line 9 gets never executed. This is a little strange, but can be explained.
The line 9 calculates the value of counter+1 but does not store the result anywhere. The C compiler detects such useless code and removes it automatically from the compilation. And the debugger simply ignores all lines that the compiler removed. You can stop the faulty program now.
Lets add a second line below the wrong one:
#include <QtGlobal>

int main(int argc, char *argv[])
{
    qDebug("start");

    int counter=0;
    while (counter<100) {
        counter+1;
        counter=counter+1;
    }
    qDebug("The result is %i", counter);

    qDebug("end");
}
Start the program again with the debugger and press F10 repeatedly to see how it works now. You can see that the counter does now increment in each loop. And you can also see that the faulty line (Nr. 9) is still skipped.
You have surely noticed the yellow warning symbol left to the faulty line. Click on it to see the related warning message "statement has no effect ... counter+1" - what a surprise!
QCoreApplication
Revert the source code back to our first "Hello World" version.
#include <QCoreApplication>

int main(int argc, char *argv[])
{
    QCoreApplication a(argc, argv);
    qDebug("Hello World");
    return a.exec();
}
Almost all Qt console applications use QCoreApplication, while graphical applications use QApplication.
Qt applictions are event driven. There is a queue in QCoreApplication which receives events and executes them one after the other. For example, if a web browser connects to the web server, the event "newConnection" will be put into the queue. Some code will be bound to that event which processes the incoming connection request.
The exec() method of QCoreApplication processes that queue in an endless loop until any event handler calls the QCoreApplication::quit() or QCoreApplication::exit().
So the start-up code of the application belongs to the place of our "Hello World" message and then everything else is driven by events. As long we have only that "Hello World" message, the application will hang, checking the event loop forever. The only action that works out of the box is closing the console window which terminates the application abnormally with the warning message "MyFirstWebApp crashed".
To get rid of that warning, the application must quit itself. Since it's no GUI application, we cannot handle any push button or menu command of the window frame. Instead we will use a timer to create an event that lets the application quit itself.
#include <QCoreApplication>
#include <QTimer>

int main(int argc, char *argv[])
{
    QCoreApplication app(argc, argv);
    qDebug("start");

    QTimer *timer = new QTimer();
    QObject::connect(timer, SIGNAL(timeout()), &app, SLOT(quit()));
    timer->start(2000);

    qDebug("entering the event loop");
    return app.exec();
}
The line with "QObject::connect" connects the signal "timeout()" of the timer with the method "quit()" of the core application. Then we start the timer with an interval of 2 seconds.
When you now run the program, you will see the "start" message as well as "entering the event loop", and then - after two seconds - the application quits. The Application Output Window looks better this time:

Exit code 0 means that the application exited without an error.
However, just closing the console window is also acceptable to almost all applications. The operating system does automatically close all open files and connections and it releases the memory that was occupied by the application. So don't worry about the "MyFirstWebApp crashed" message.
Signals and Slots
I did not explain what exactly a signal is. Looking at the source code above, it seems that both signals and slots are object methods. Well, this is halfway true, and you should really learn the full truth.
From the objects viewpoint, a signal is a declared method within the "signals:" section. But you don't write an implementation for it. A slot is a method which you have to implement. You define what shall happen when a slot gets called.
They are declared this way in the header files:
class QTimer : public QObject {
    Q_OBJECT
signals:
    void timeout();
}

class QCoreApplication : public QObject {
    Q_OBJECT
public slots:
    void quit();
}
Signals are always public, so the keyword "public" is optional. Slot methods may be private, protected or public. Signals and slot methods can also be called directly like regular methods.
The Q_OBJECT keyword activates some magic on top of the C++ programing language. This is the point, where the Meta Object Compiler (MOC) shows up. It generates code for reflection which is not a C++ feature, but required by the signal/slot mechanism.
Qt inserts the Meta Object Compiler into the C++ toolchain. It generates additional source code files which contain the code for reflection. For example, the file qtimer.cpp gets an additional generated file with the name moc_qtimer.cpp.
All objects that inherit directly or indirectly from QObject must contain the Q_OBJECT keyword.
You have to know that signals are connected at runtime. And because of that, the program can also modify and remove the connections at runtime. The connections are not hardwired like regular method calls. That's a fundamental difference to the C++ programming paradigm. In a GUI application, you could connect the keydown() event to a text box initially and later change the connection to some other input element.
By the way, signals and slots can have arguments to pass data from the sender to the recipient.
Even if you don't need that level of flexibility, you have to understand the signal/slot stuff because the whole Qt framework is using it. Please read the article Signals&Slots in the Qt documentation and click here to learn what's happening under hood.
So to summarize the timer event example above, we can say that the timer calls its own timeout() signal after two seconds delay, which is connected to the quit() method of QCoreApplication by some auto-magic of the MOC compiler. We use the connect() method, to set up that connection at runtime.
Are you baffled now? No matter. You can write web server applications without fiddling with signals and slots. The QtWebApp library handles the mandatory signals for you.
Memory Management
A regular C++ application creates object instances on the heap with new() and cleans up with delete(). The latter one is often forgotten, so C++ programs tend to have memory leaks. To prevent such errors, Qt introduces another alternative method.
Please download this MyFirstWebApp_1.zip example project and open it in your Qt Creator. It contains the following main file plus the sources of the Father and Child classes. Take a look at them.
#include <QCoreApplication>
#include "father.h"
#include "child.h"

int main(int argc, char *argv[])
{
    QCoreApplication app(argc, argv);
    qDebug("start");

    Father* father=new Father();
    Child*  child1=new Child(1);
    Child*  child2=new Child(2);
    Child*  child3=new Child(3);

    qDebug("now cleaning up");
    delete(father);
    delete(child1);
    delete(child2);
    delete(child3);

    return app.exec();
}
Here you see how a C++ program would normally clean up objects from heap. If you run it, you get the following output in the console window:

And now we apply the Qt style:
#include <QCoreApplication>
#include "father.h"
#include "child.h"

int main(int argc, char *argv[])
{
    QCoreApplication app(argc, argv);
    qDebug("start");

    Father* father=new Father();
    Child*  child1=new Child(1,father);
    Child*  child2=new Child(2,father);
    Child*  child3=new Child(3,father);

    qDebug("now cleaning up");
    delete(father);

    return app.exec();
}
This program produces exactly the same output as before, but contains only one single delete() command. The destructor of the Father object does automatically delete all children. The connection between them had been made by the "parent" argument of the constructor. This works also for whole trees of objects, with unlimited nesting depth. All objects that are (directly or indirectly) derived from QObject support this feature. So the whole Qt framework does.
Logging
You used already qDebug() several times to output text in the console window. You have surely noticed that qDebug() is similar to printf() from the C programming language.
The QtGlobal include file defines some more related functions:
| Level | Function | Description |
|---|---|---|
| 0 | qDebug() | outputs a debug message |
| 1 | qWarning() | outputts a warning message |
| 2 | qCritical() | outputs an error message |
| 3 | qFatal() | outputs a fatal error message and aborts the program |
| 4 | qInfo() | outputs an info message |
The output of these methods can be redirected to something else by installing a message handler, as described here. The "Logger" class of QtWebApp uses this technique. I explain it farther down.
Another useful related function is qPrintable() which converts strings to temporary char arrays:
QString name("Maria");
    qDebug("The name is %s", qPrintable(name));
    qDebug() << "The name is" << name;
The first syntax of qDebug() accepts only simple types (int, char, float, ...) and so on, like printf() also does. qPrintable() converts the QString into an 8bit character array.
The second syntax of qDebug() supports any object that is prepared to be used with streams "cout".
Interactive Console
Although it's not needed for web servers, I like to show you how to write interactive console applications:
#include <QTextStream>
#include <QString>

int main(int argc, char *argv[])
{
    QTextStream out(stdout);
    QTextStream in(stdin);

    out << "Enter your name: " << flush;
    QString value = in.readLine();
    out << "Hello " << value << endl;

    out << "Enter two numbers: " << flush;
    int num1;
    int num2;
    in >> num1;
    in >> num2;
    out << "You entered " << num1 << " and " << num2 << endl;
}

Use QTextStream to read from and write to the console. It's the Qt counterpart of the standard C++ objects stdio::cout and std::cin, which you could also use. However mixing the standard C++ library with Qt is considered as bad practise.
Notice that qDebug() is designed to output log messages, while QTextStream is designed to operate on the console.
We can omit the QCoreApplication because this program does not depend on events and the two used Qt classes also don't need it. However, many other Qt classes need it. In case of doubt, you should check the API documentation of the used classes.
Running outside Qt Creator
Linux
You can run Qt console applications from the command-line in a terminal window. If you get an error message that a shared library is not found, you have to set the LD_LIBRARY_PATH environment variable. For example by adding the following lines to the file .profile in your home directory:
LD_LIBRARY_PATH=/opt/qt/5.4/gcc/lib:$LD_LIBRARAY_PATH
export LD_LIBRARY_PATH
Then log out and log in again to activate the changes.
Windows
In case of Windows, you may distribute the required DLL files (e.g. Qt5Core.dll) together with your *.exe file in the same directory. If you don't do that, then Qt must be installed on the target computer by the regular installation tool (which is called Qt Maintenance Tool).
How to use QtWebApp
If you have ever developed web server applications with the Java Servlet API, you will feel like at home. My library provides almost the same functionality. I will show you how to write a minimal web server application with QtWebApp. Then we will discover the main features step by step.
Hello World
Extract the QtWebApp.zip file in your programming folder and create a new Qt console project with the name "MyFirstWebApp", if not already done. You should then have the same folder structure than I have:

Add the following lines to the project file of the MyFirstWebApp project:
- QT += network
- include(../QtWebApp/QtWebApp
/httpserver/httpserver.pri)
The first line activates the network module of Qt, and the second line includes the source code of the HTTP Server module of QtWebApp. So when you compile the program, the HTTP Server becomes part of the executable file.

As an alternative, you may work with a shared library. To generate it, you open the project QtWebApp/QtWebApp/QtWebApp.pro and build it. Then take a look at QtWebapp/Demo2/Demo2.pro to see how to link against the shared library. However, I recommend to include the source code as shown above, because that's less error-prone.
The next step is to create the configuration file MyFirstWebApp/etc/webapp1.ini. You need to do that with the file manager of your operating system, because Qt Creator cannot create new folders. The file content is:
[listener]
;host=192.168.0.100
port=8080
minThreads=4
maxThreads=100
cleanupInterval=60000
readTimeout=60000
maxRequestSize=16000
maxMultiPartSize=10000000
The host and port parameters specify on which IP address and port the web server listens. If you comment out the host (as above) then the server listens on all network interfaces. Public webservers use port 80 while internal web servers usually listen on port 8080. You may use any free port that you like.
Unix users should keep in mind that the port numbers below 1024 are reserved to the "root" user. Windows users might need to configure the Windows firewall to enable access from other computers.
QtWebApp can process multiple HTTP requests concurrently, so it's multi-threaded. Because starting a new thread takes a significant amount of time, QtWebApp re-uses threads for subsequent HTTP requests.
The maxThreads value specifies the maximum number of concurrent worker threads. Before going into the production environment, you should use a load generator tool to find out how much load your server can handle without running out of memory or becoming sluggish.
The web server always starts with an empty thread pool. The threads are created on demand when HTTP requests come in. Idle threads are closed slowly by a timer. Every cleanupInterval in milliseconds, the server closes one idle thread. But the minThreads amount is always kept running.
With the given values, your server can handle up to 100 concurrent HTTP connections. It keeps 4 idle worker thread running to ensure good response times.
The readTimeout setting protects the server against simple denial-of-service attacks by opening lots of connections and not using them. Idle connections are closed after that number of milliseconds. Under normal circumstances, the web browser is responsible to close connections.
The maxRequestSize protects the server from memory overload by very large HTTP requests. This value applies to regular requests. The other maxMultiPartSize value applies to multi-part requests which occur when the web browser uploads a file to the server. If you want to accept files of 10 Megabytes, you have to set this value a little larger because of the HTTP protocol overhead.
File uploads are stored in temporary files. The location of temporary folder is defined by the operating system.
Well, lets continue to create our first web application. To make this configuration file visible in Qt Creator, add one line to the project file:
- OTHER_FILES += etc/webapp1.ini
Now we add some code to load that file:
#include <QCoreApplication>
#include <QSettings>

int main(int argc, char *argv[])
{
    QCoreApplication app(argc, argv);

    QSettings* listenerSettings=
         new QSettings("/home/sfrings/programming/MyFirstWebApp/etc/webapp1.ini",QSettings::IniFormat,&app);
    qDebug("config file loaded");

    return app.exec();
}
But I prefer to search the config file in several folders automatically, so I can run the application inside and outside the IDE without changing the path:
#include <QCoreApplication>
#include <QSettings>
#include <QFile>
#include <QDir>
#include <QString>

/**
 * Search the configuration file.
 * Aborts the application if not found.
 * @return The valid filename
 */
QString searchConfigFile() {
    QString binDir=QCoreApplication::applicationDirPath();
    QString appName=QCoreApplication::applicationName();
    QString fileName("Demo1.ini");

    QStringList searchList;
    searchList.append(binDir);
    searchList.append(binDir+"/etc");
    searchList.append(binDir+"/../etc");
    searchList.append(binDir+"/../"+appName+"/etc");     // for development with shadow build (Linux)
    searchList.append(binDir+"/../../"+appName+"/etc");  // for development with shadow build (Windows)
    searchList.append(QDir::rootPath()+"etc/opt");
    searchList.append(QDir::rootPath()+"etc");

    foreach (QString dir, searchList)
    {
        QFile file(dir+"/"+fileName);
        if (file.exists())
        {
            fileName=QDir(file.fileName()).canonicalPath();
            qDebug("Using config file %s",qPrintable(fileName));
            return fileName;
        }
    }

    // not found
    foreach (QString dir, searchList)
    {
        qWarning("%s/%s not found",qPrintable(dir),qPrintable(fileName));
    }
    qFatal("Cannot find config file %s",qPrintable(fileName));
    return nullptr;
}


int main(int argc, char *argv[])
{
    QCoreApplication app(argc, argv);

    // Load the configuration file
    QString configFileName=searchConfigFile();
    QSettings* listenerSettings=new QSettings(configFileName, QSettings::IniFormat, &app);
    qDebug("config file loaded");

    return app.exec();
}
The procedure searchConfigFile() searches the file in several folders.
The method QDir::canonicalPath() converts relative path names to the absolute form, which looks nicer in the following debug message.
If the file was not found, then the application outputs an error message with qFatal() which also aborts the program.
Once the configuration file is loaded, you can create a HTTP listener object, which is the core of the web server:
#include <QCoreApplication>
#include <QSettings>
#include <QFile>
#include <QDir>
#include <QString>
#include "httplistener.h"
#include "httprequesthandler.h"

using namespace stefanfrings;

int main(int argc, char *argv[])
{
    QCoreApplication app(argc, argv);

    // Load the configuration file
    QString configFileName=searchConfigFile();
    QSettings* listenerSettings=new QSettings(configFileName, QSettings::IniFormat, &app);
    listenerSettings->beginGroup("listener");

    // Start the HTTP server
    new HttpListener(listenerSettings, new HttpRequestHandler(&app), &app);

    return app.exec();
}
The method QSettings::beginGroup() selects the group "[listener]" from the configuration file. We will add more groups later.
The HttpRequestHandler receives all incoming HTTP requests and it generates the responses. By default, the request handler simply returns an error page. We will change that soon.
It is important to create the HttpListener on the heap with "new", otherwise it would terminate immediately after the program start.
Run the program and open the URL http://localhost:8080 in your favorite web browser. You will receive the error page "501 not implemented" and debug messages in the console window.

That are a lot of messages which slow down the program, but they are helpful for debugging. In the left border of Qt Creator, you can change the build mode from "Debug" to "Release" by clicking the purple button. The release version is less verbose:

So for production, you should prefer the release build.
In order to output a "Hello World" message, we have to write our own request handler. Click on the src folder with the right mouse button, select "Add New..." and then select "C++ class".
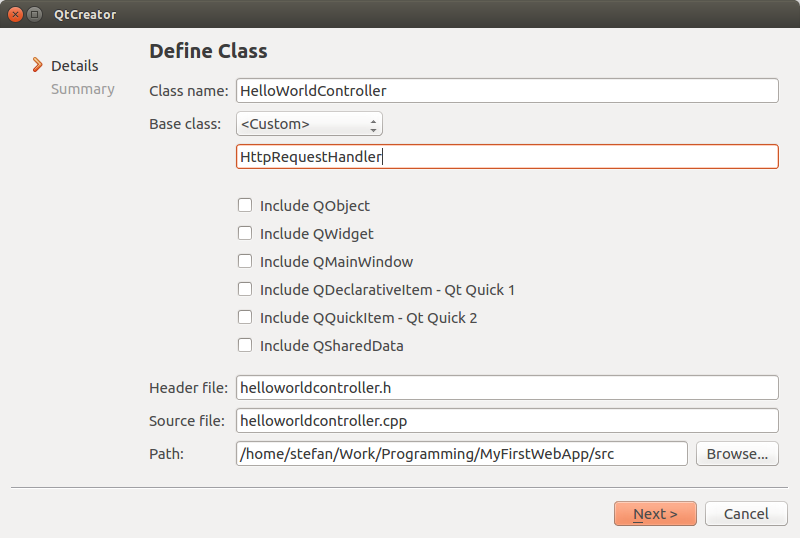
helloworldcontroller.h:
#ifndef HELLOWORLDCONTROLLER_H
#define HELLOWORLDCONTROLLER_H

#include "httprequesthandler.h"

using namespace stefanfrings;

class HelloWorldController : public HttpRequestHandler {
    Q_OBJECT
public:
    HelloWorldController(QObject* parent=0);
    void service(HttpRequest& request, HttpResponse& response);
};

#endif // HELLOWORLDCONTROLLER_H
helloworldcontroller.cpp:
#include "helloworldcontroller.h"

HelloWorldController::HelloWorldController(QObject* parent)
    : HttpRequestHandler(parent) {
    // empty
}

void HelloWorldController::service(HttpRequest &request, HttpResponse &response) {
    response.write("Hello World",true);
}
The optional argument "true" indicates that this was the last call to write() for the current HTTP request.
Two changes in main.cpp:
#include "helloworldcontroller.h"

    new HttpListener(listenerSettings,new HelloWorldController(&app),&app);
Run the program and open the URL http://localhost:8080 in your web browser.

You've done it! Your webserver greets the world.
The final "Hello World" project: MyFirstWebApp_2.zip
Dynamic HTML
The "Hello World" application from above did output simple plain text. But the language of the web is HTML. So lets see how to generate HTML. We will output the current time and display some data from a list object.
Similar to the first HelloWorldController, create another new class with name ListDataController.
listdatacontroller.h:
#ifndef LISTDATACONTROLLER_H
#define LISTDATACONTROLLER_H

#include <QList>
#include <QString>
#include "httprequesthandler.h"

using namespace stefanfrings;

class ListDataController: public HttpRequestHandler {
    Q_OBJECT
public:
    ListDataController(QObject* parent=0);
    void service(HttpRequest& request, HttpResponse& response);
private:
    QList<QString> list;
};

#endif // LISTDATACONTROLLER_H
listdatacontroller.cpp:
#include <QTime>
#include "listdatacontroller.h"

ListDataController::ListDataController(QObject* parent)
    : HttpRequestHandler(parent) {
    list.append("Robert");
    list.append("Lisa");
    list.append("Hannah");
    list.append("Ludwig");
    list.append("Miranda");
    list.append("Francesco");
    list.append("Kim");
    list.append("Jacko");
}

void ListDataController::service(HttpRequest &request, HttpResponse &response) {
    response.setHeader("Content-Type", "text/html; charset=UTF-8");
    response.write("<html><body>");

    response.write("The time is ");
    QString now=QTime::currentTime().toString("HH:mm:ss");
    response.write(now.toUtf8());

    response.write("<p>List of names:");
    response.write("<table border='1' cellspacing='0'>");
    for(int i=0; i<list.size(); i++) {
        QString number=QString::number(i);
        QString name=list.at(i);
        response.write("<tr><td>");
        response.write(number.toUtf8());
        response.write("</td><td>");
        response.write(name.toUtf8());
        response.write("</td></tr>");
    }
    response.write("</table>");

    response.write("</body></header>",true);
}
The constructor fills the list with some names. The service method outputs a HTML document with the current time and a table that shows the content of the list object.
Note that we set a HTTP response header before writing the document, which tells the browser what file format (see Internet Media Types) and character encoding we are using.
Replace the controller in main.cpp by the new one:
#include "listdatacontroller.h"

    new HttpListener(listenerSettings,new ListDataController(&app),&app);
Run and test the application. The output should look so:

Request Mapper
We have now two different controller classes in our application but can only use one at a time. Now we create a "RequestMapper" class that will switch between both controllers. As before, the new class inherits again from HttpRequestHandler.
requestmapper.h:
#ifndef REQUESTMAPPER_H
#define REQUESTMAPPER_H

#include "httprequesthandler.h"

using namespace stefanfrings;

class RequestMapper : public HttpRequestHandler {
    Q_OBJECT
public:
    RequestMapper(QObject* parent=0);
    void service(HttpRequest& request, HttpResponse& response);
};

#endif // REQUESTMAPPER_H
requestmapper.cpp:
#include "requestmapper.h"
#include "helloworldcontroller.h"
#include "listdatacontroller.h"

RequestMapper::RequestMapper(QObject* parent)
    : HttpRequestHandler(parent) {
    // empty
}

void RequestMapper::service(HttpRequest& request, HttpResponse& response) {
    QByteArray path=request.getPath();
    qDebug("RequestMapper: path=%s",path.data());

    if (path=="/" || path=="/hello") {
        HelloWorldController().service(request, response);
    }
    else if (path=="/list") {
        ListDataController().service(request, response);
    }
    else {
        response.setStatus(404,"Not found");
        response.write("The URL is wrong, no such document.",true);
    }

    qDebug("RequestMapper: finished request");
}
Replace the old controller in main.cpp by the new request mapper:
#include "requestmapper.h"

    new HttpListener(listenerSettings,new RequestMapper(&app),&app);
The request mapper calls one of our two controllers depending on the requested path.
So when you now open http://localhost:8080/ or http://localhost:8080/hello, you get the "Hello World" page. And when you open http://localhost:8080/list, you get the list of names.
If you try to open any wrong URL, for example http://localhost:8080/lalala, then you receive the error message "The URL is wrong..." plus the status code 404 which is the technical value for "Not found". Some programs use that to handle errors. If you do not set a status code, then the default 200 is used, which means "success". See List of HTTP status codes in Wikipedia.
If multipe concurrent HTTP requests come in at the same time, then the service() method is executed multiple times in parallel. So this method is multi-threaded. That has to be considered when you access variables that are declared outside the service() method.
People say that the request mapper is a "singleton" or in "application scope" because there is exactly one instance of it.
The two controller classes (HelloWorldController and ListDataController) are in "request scope", which means that each request is handled by its own fresh instance of this class. That costs some performance but simplifies programming a little.
A small modification changes the scope of the two controller classes to "application scope":
new requestmapper.h:
#ifndef REQUESTMAPPER_H
#define REQUESTMAPPER_H

#include "httprequesthandler.h"
#include "helloworldcontroller.h"
#include "listdatacontroller.h"

using namespace stefanfrings;

class RequestMapper : public HttpRequestHandler {
    Q_OBJECT
public:
    RequestMapper(QObject* parent=0);
    void service(HttpRequest& request, HttpResponse& response);
private:
    HelloWorldController helloWorldController;
    ListDataController listDataController;
};

#endif // REQUESTMAPPER_H
new requestmapper.cpp:
#include "requestmapper.h"

RequestMapper::RequestMapper(QObject* parent)
    : HttpRequestHandler(parent) {
    // empty
}

void RequestMapper::service(HttpRequest& request, HttpResponse& response) {
    QByteArray path=request.getPath();
    qDebug("RequestMapper: path=%s",path.data());

    if (path=="/" || path=="/hello") {
        helloWorldController.service(request, response);
    }
    else if (path=="/list") {
        listDataController.service(request, response);
    }
    else {
        response.setStatus(404,"Not found");
        response.write("The URL is wrong, no such document.");
    }

    qDebug("RequestMapper: finished request");
}
Now every request re-uses the only one instance of HelloWorldController or ListDataController. They are only created once during startup because the HttpRequestMapper does also exist only once.
When you have learned how to use sessions, you can also create instances of controllers per session and store them in the session store. Then you have a "session scope". Sessions are explained farther down.
The request mapper project: MyFirstWebApp_3.zip
Processing User Input
Web applications usually process user input. We will develop a login form to see how that goes.
Create a new class with name LoginController. Again, it is derived from HttpRequestHandler.
logincontroller.h:
#ifndef LOGINCONTROLLER_H
#define LOGINCONTROLLER_H

#include "httprequesthandler.h"

using namespace stefanfrings;

class LoginController : public HttpRequestHandler {
    Q_OBJECT
public:
    LoginController(QObject* parent=0);
    void service(HttpRequest& request, HttpResponse& response);
};

#endif // LOGINCONTROLLER_H
logincontroller.cpp:
#include "logincontroller.h"

LoginController::LoginController(QObject* parent)
    :HttpRequestHandler(parent) {
    // empty
}

void LoginController::service(HttpRequest &request, HttpResponse &response) {
    QByteArray username=request.getParameter("username");
    QByteArray password=request.getParameter("password");

    qDebug("username=%s",username.constData());
    qDebug("password=%s",password.constData());

    response.setHeader("Content-Type", "text/html; charset=UTF-8");
    response.write("<html><body>");

    if (username=="test" and password=="hello") {
        response.write("Yes, correct");
    }
    else {
        response.write("<form method='POST' action='/login'>");
        if (!username.isEmpty()) {
            response.write("No, that was wrong!<br><br>");
        }
        response.write("Please log in:<br>");
        response.write("Name:  <input type='text' name='username'><br>");
        response.write("Password: <input type='password' name='password'><br>");
        response.write("<input type='submit'>");
        response.write("</form");
    }

    response.write("</body></html>",true);
}
Add this new controller to the request mapper as we did above.
New lines in requestmapper.h:
#ifndef REQUESTMAPPER_H
#define REQUESTMAPPER_H

#include "httprequesthandler.h"
#include "helloworldcontroller.h"
#include "listdatacontroller.h"
#include "logincontroller.h"

class RequestMapper : public HttpRequestHandler {
    Q_OBJECT
public:
    RequestMapper(QObject* parent=0);
    void service(HttpRequest& request, HttpResponse& response);
private:
    HelloWorldController helloWorldController;
    ListDataController listDataController;
    LoginController loginController;
};

#endif // REQUESTMAPPER_H
And three new lines in requestmapper.cpp:
#include "requestmapper.h"

RequestMapper::RequestMapper(QObject* parent)
    : HttpRequestHandler(parent) {
    // empty
}

void RequestMapper::service(HttpRequest& request, HttpResponse& response) {
    QByteArray path=request.getPath();
    qDebug("RequestMapper: path=%s",path.data());

    if (path=="/" || path=="/hello") {
        helloWorldController.service(request, response);
    }
    else if (path=="/list") {
        listDataController.service(request, response);
    }
    else if (path=="/login") {
        loginController.service(request, response);
    }
    else {
        response.setStatus(404,"Not found");
        response.write("The URL is wrong, no such document.");
    }

    qDebug("RequestMapper: finished request");
}
Next time I will not display the whole source code anymore.
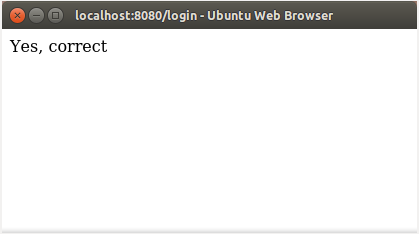
Run the program and open the URL http://localhost:8080/login. You will see this form:

Try to login with a wrong name and password. Then the browser shows the error message "That was wrong" and prompts to try again. If you enter the correct credentials (username "test" and password "hello"), then you get the success message.
The source code does not contain much stuff that needs an explanation. The HTML form defines two input fields with the names "username" and "password". And the controller uses request.getParameter() to get the values.
Request.getParameter() returns an empty QByteArray when either the parameter is empty or when there is no such parameter in the incoming HTTP request. This latter case happens when you open the URL http://localhost:8080/login initially. The form fields are only sent from the web browser to the web server when the user clicks on the submit button.
If you feel the need to distinguish between empty and missing fields, then you may use request.getParameterMap() and then check if the required parameter is in the returned map.
As an alternativ to forms, parameters can also be transported as part of the URL. For example, you can also log in by opening the URL http://localhost:8080/login?username=test&password=hello.
Some special characters must be encoded into escape sequences when used in an URL. For example, if the username would be "Stefan Frings", then you have to write http://localhost:8080/login?username=Stefan%20Frings&password=hello. The HttpRequest class decodes that automatically back to the original form "Stefan Frings".
If you ever need to encode strings into URL format, you may use the QUrl class.
Sessions
The next logical step is to work with session data. That means, we keep data about the current user somewhere and use that data in subsequent requests. The first data that we will store are the name of the user and the time when he logged in.
QtWebApp uses cookies under the hood to identify users.
We have to add a new section to the configuration file webapp1.ini which controls the session store class:
[sessions]
expirationTime=3600000
cookieName=sessionid
;cookieDomain=mydomain.com
cookiePath=/
cookieComment=Identifies the user
The expiration time defines the number of milliseconds after that an unused session is deleted from memory. When the user comes back after that time, his session is lost, so he must login again.
The cookie name can be any - however the name "sessionid" is commonly used. Some load balancer depend on that name, so you should not change it unless having a good reason.
Each cookie is always bound to a domain. A cookie that was generated by google.com is only sent to servers on that domain. The cookieDomain parameter is automatically set by the web browser if you leave that setting empty or comment it out. You can specify another domain name, but I have no idea why men should do that. So leave it empty unless you know what you are doing.
The cookie path can be used to restrict the cookie to a part of your domain. If you change the cookiePath to /my/very/cool/online/shop, then the browser would send the cookie to your server only for pages that start with this path. The default value is "/" which means the cookie is valid for all websites on your domain.
The cookieComment is a text that some web browsers display in the cookie management screen.
We will need an instance of the HttpSessionStore class which shall be reachable by the whole program, hence in global space. Therefore we create two new files, first global.h:
#ifndef GLOBAL_H
#define GLOBAL_H

#include "httpsessionstore.h"

using namespace stefanfrings;

extern HttpSessionStore* sessionStore;

#endif // GLOBAL_H
And global.cpp:
#include "global.h"

HttpSessionStore* sessionStore;
Now we have a global static pointer with name "sessionStore" that the whole program can access by including the file global.h. Let's load the new configuration settings and initialize the sessionStore.
Changes in main.cpp:
#include "global.h"

int main(int argc, char *argv[])
{
    QCoreApplication app(argc, argv);
    QString configFileName=searchConfigFile();

    // Session store
    QSettings* sessionSettings=new QSettings(configFileName,QSettings::IniFormat,&app);
    sessionSettings->beginGroup("sessions");
    sessionStore=new HttpSessionStore(sessionSettings,&app);

    // HTTP server
    QSettings* listenerSettings=new QSettings(configFileName,QSettings::IniFormat,&app);
    listenerSettings->beginGroup("listener");
    new HttpListener(listenerSettings,new RequestMapper(&app),&app);

    return app.exec();
}
Notice that main.cpp now loads the configuration file twice. The sessionSettings object picks out the "sessions" section, while the listenerSettings picks out the "listener" section. For each section, you need a separate instance of QSettings, otherwise the sections may be confused.
Now that we have created a storage for session data, we can start using it. Add to logincontroller.cpp:
#include <QTime>
#include "logincontroller.h"
#include "global.h"

LoginController::LoginController(QObject* parent)
    :HttpRequestHandler(parent) {
    // empty
}

void LoginController::service(HttpRequest &request, HttpResponse &response) {
    HttpSession session=sessionStore->getSession(request,response,true);
    QByteArray username=request.getParameter("username");
    QByteArray password=request.getParameter("password");

    qDebug("username=%s",username.constData());
    qDebug("password=%s",password.constData());

    response.setHeader("Content-Type", "text/html; charset=UTF-8");
    response.write("<html><body>");

    if (session.contains("username")) {
        QByteArray username=session.get("username").toByteArray();
        QTime logintime=session.get("logintime").toTime();
        response.write("You are already logged in.<br>");
        response.write("Your name is: "+username+"<br>");
        response.write("You logged in at: "+logintime.toString("HH:mm:ss")+"<br>");
    }
    else {
        if (username=="test" and password=="hello") {
            response.write("Yes, correct");
            session.set("username",username);
            session.set("logintime",QTime::currentTime());
        }
        else {
            response.write("<form method='POST' action='/login'>");
            if (!username.isEmpty()) {
                response.write("No, that was wrong!<br><br>");
            }
            response.write("Please log in:<br>");
            response.write("Name:  <input type='text' name='username'><br>");
            response.write("Password: <input type='password' name='password'><br>");
            response.write("<input type='submit'>");
            response.write("</form");
        }
    }

    response.write("</body></html>",true);
}
Here it is important to call sessionStore->getSession() before the first call to response.write(), because it creates or refreshes the session cookie which is technically a HTTP header. And all HTTP headers must be sent before the HTML document.
Run and test the program by opening http://localhost:8080/login.

When you now take a look into the console window of the web server, you will see that a cookie and a session had been created with a unique id, which is a long random hexadecimal number.
I took the following screenshot from my Chromium browser, where you can see my cookie:

The user sessionis initially empty. It just exists and has a unique id number. Nothing else. Enter username "test" and password "hello". Then you get the expected confirmation.
While confirming the successful login, the server puts the username and login time into the users session. You can put any object into the session that is supported by QVariant. When you put an object into the session, you give it a symbolic name for later access.
Now open again the URL http://localhost:8080/login. Then you see the result of all that work:
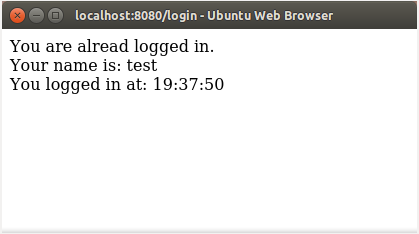
So after successful validation of username and password, the server uses the session to remember data of that user.
The session store is kept in memory. When you restart the web server, then all data in the session store are lost. So use it only for some few temporary data. Persistent data belong into a database but that's not covered by this tutorial.
The session cookie project: MyFirstWebApp_4.zip
Cookies
As an alternative to the session store, you can also store small amount of data in cookies. Cookies are stored on the client side in the web browser, not on the server side. Cookies can only store 8bit text, and only 4 Kilobytes are guaranteed to work. Also the number of cookies per domain is limited, so use them sparing.
To try that out, lets add a new controller class with name CookieTestController and bind it to the path "/cookie". I hope you know already how to do that. In case of problems take a look into the ZIP file at the end of this chapter.
cookietestcontroller.cpp:
#include "cookietestcontroller.h"

CookieTestController::CookieTestController(QObject* parent)
    : HttpRequestHandler(parent) {
    // empty
}

void CookieTestController::service(HttpRequest &request, HttpResponse &response) {

    QByteArray cookie=request.getCookie("testcookie");
    if (!cookie.isEmpty()) {
        response.write("Found cookie with value: "+cookie,true);
    }
    else {
        HttpCookie cookie("testcookie","123456789",60);
        response.setCookie(cookie);
        response.write("A new cookie has been created.",true);
    }

}
The name of the cookie is "testcookie" and it has the value "123456789". The 60 is the validity time in seconds. This cookie expires one minute after it has been created. We use that short time to see what happens when the cookie expires. You would normally use much larger times, possibly several days.
Request.getCookie() returns only the value of the cookie, not a whole HttpCookie object. This is for performance reason.
Run the program and open http://localhost:8080/cookie.

Then load the same page again, and you will see that the server received the cookie properly:

Cookies are stored in the web browser and sent to the web server with each HTTP request. Other than session data, cookies are are not lost if you restart the server, because cookies are stored on the client side.
This is again a screenshot from my Chromium browser:

Here you can also see that the session cookie is still there. We have now two cookies for the domain localhost.
If you wait two minutes and then load again http://localhost:8080/cookie you will see that the test cookie has expired. The server creates a new one.
If you want to prevent that the cookie expires while the user is active, then you have to re-create the cookie on each request. Then the browser calculates a new expiration date on each request.
The cookie test project: MyFirstWebApp_5.zip
HTTP Redirects
Sometimes you want to redirect the browser to another page. This is often used for websites that require the user to log in. If the user is not logged in, he gets redirected to the login page. Of course, the login page itself must be accessible to anonymous users.
This is very simple. Changes in requestmapper.cpp:
void RequestMapper::service(HttpRequest& request, HttpResponse& response) {
    QByteArray path=request.getPath();
    qDebug("RequestMapper: path=%s",path.data());

    QByteArray sessionId=sessionStore->getSessionId(request,response);
    if (sessionId.isEmpty() && path!="/login") {
        qDebug("RequestMapper: redirect to login page");
        response.redirect("/login");
        return;
    }

    else if (path=="/login") {
        ...
    }

    else if (path=="/whatever") {
        ...
    }

    qDebug("RequestMapper: finished request");
}
Internationalisation
Did you wonder why the HTTP server always uses QByteArray instead of QString? This has a simple reason: performance. The whole HTTP protocol is based on an 8bit encoding, so I decided not to waste CPU time by converting that forth and back unnecessarily.
But you can use Unicode - of course. I show you one example:
void UnicodeController::service(HttpRequest& request, HttpResponse& response) {
    QString chinese=QString::fromUtf8("美丽的花朵需要重症监护");
    response.setHeader("Content-Type", "text/html; charset=UTF-8");
    response.write(chinese.toUtf8(),true);
}
That is the chinese translation for "beautiful flowers need intensive care", presented by Google translator (I don't speak chinese).
The conversion from QString to UTF-8 is not slower than the conversion to Latin1. So feel free to use Unicode if you need. But do never forget to use QString::fromUtf8. If you simply write chinese="美丽的花朵需要重症监护", you would only get garbage. See QString documentation.
Static Files
QtWebapp would be incomplete if it could not deliver static files that are stored in a folder on the server. The StaticFileController provides that feature. But before you can use it, you need some additional configuration settings in the ini file:
[files]
path=../docroot
encoding=UTF-8
maxAge=90000
cacheTime=60000
cacheSize=1000000
maxCachedFileSize=65536
The path setting specifies the base folder where static files are stored. It is relative to the configuration file. You could also write absolute path names like "/opt/server/docroot" or "C:/server/docroot".
The encoding parameter is only used for *.txt and *.html files, to tell the browser which encoding these files have. If you ever need different encodings simultaneously, you have to create multiple instances of the StaticFileController - one for each encoding.
The other parameters control cacheing. First you should know that the operating system caches files already. However I found out that both Linux and Windows do not perform well with small files. Therefore I recommend to use an application-internal cache - but only for small files.
So cacheTime controls how many milliseconds files are hold in memory at maximum. The value 0 means, that files are kept in memory as long there is enough space. CacheSize specifies how much memory the cache is allowed to occupy. One megabyte is a good value to start with. If people request files that are not in the cache, then the oldest files are removed to free up space for the new files.
The maxCachedFileSize controls the maximum size of individual files in the cache. Larger files are not cached by the web server application. But as I wrote - the operating system caches large files well. It turned out that 64 kilobytes is a good value to start with.
The maxAge parameter means basically the same as cacheTime but controls the cache of the web browser - not the server.
We need a global pointer to a StaticFileController instance, to make it accessible to the whole program. First add to global.h:
#ifndef GLOBAL_H
#define GLOBAL_H

#include "httpsessionstore.h"
#include "staticfilefontroller.h"

using namespace stefanfrings;

extern HttpSessionStore* sessionStore;
extern StaticFileController* staticFileController;

#endif // GLOBAL_H
#include "global.h"

HttpSessionStore* sessionStore;
StaticFileController* staticFileController;
In main.cpp, we configure the instance of the StaticFileController:
int main(int argc, char *argv[])
{
    QCoreApplication app(argc, argv);
    QString configFileName=searchConfigFile();

    // Session store
    QSettings* sessionSettings=new QSettings(configFileName,QSettings::IniFormat,&app);
    sessionSettings->beginGroup("sessions");
    sessionStore=new HttpSessionStore(sessionSettings,&app);

    // Static file controller
    QSettings* fileSettings=new QSettings(configFileName,QSettings::IniFormat,&app);
    fileSettings->beginGroup("files");
    staticFileController=new StaticFileController(fileSettings,&app);

    // HTTP server
    QSettings* listenerSettings=new QSettings(configFileName,QSettings::IniFormat,&app);
    listenerSettings->beginGroup("listener");
    new HttpListener(listenerSettings,new RequestMapper(&app),&app);

    return app.exec();
}
Now we can use the staticFileController in requestmapper.cpp:
#include "requestmapper.h"
#include "httpsession.h"
#include "global.h"

void RequestMapper::service(HttpRequest& request, HttpResponse& response) {
    QByteArray path=request.getPath();
    qDebug("RequestMapper: path=%s",path.data());

    if (path=="/" || path=="/hello") {
        helloWorldController.service(request, response);
    }
    else if (path=="/list") {
        listDataController.service(request, response);
    }
    else if (path=="/login") {
        loginController.service(request, response);
    }
    else if (path=="/cookie") {
        cookieTestController.service(request, response);
    }
    else if (path.startsWith("/files")) {
        staticFileController->service(request,response);
    }
    else {
        response.setStatus(404,"Not found");
        response.write("The URL is wrong, no such document.");
    }

    qDebug("RequestMapper: finished request");
}
Now create the folder MyFirstWebApp/docroot/files and then create an HTML file with the name hello.html:
<html>
    <body>
        Hello World!
    </body>
</html>
Start the program and open http://localhost:8080/files/hello.html. Your browser will receive the content of that file.
You can add other files (images, css, javascript, ...) to this folder and create more sub-folders if you like.
In case of "file not found" errors, the debug messages will help you to find out which file the server really attempted to load.
The file loader project: MyFirstWebApp_6.zip
So far, you learned to use all objects of the HTTP Server module of QtWebApp. But there is more...
Templates
You wrote several controllers that generate HTML documents by concatenating hardcoded text fragments which are spread in the C++ source code files. The source code does not look well formatted, and the generated HTML documents are also ugly. If you have to generate larger complex websites, that would become painful.
So the whole world of web developers choose between some alternatives:
- Go the reverse way by inserting program code into HTML documents, like JSP and PHP can do - for example.
- Use Javascript (AJAX) on the client side to generate screens from raw data provided by the server.
- Merge data into prepared HTML files before sending the result to the web browser.
The first approach requires a programming language that can compile machine code at runtime - so that wont work well with C++.
The second approach may run slow on small remote devices (e.g. smartphones) and depends on the limited debugging support of the browsers. However I see good progress here, the browsers and tools become better every year.
The last approach is technically much simpler because it's just a matter of search/replace operations on plain text. And that provides the best performance on average web sites while it consumes a moderate amount of memory. Modern CPU's can modify strings with an impressive speed. So this is what my Template class provides.
But first I like to warn you: The Template class keeps the whole generated document in memory until it has been sent out. You should not attempt to process documents of 100 Megabytes or more with that class. Use the Template engine only for websites of normal size.
You may use the template engine for any text based file formats, not only HTML. It is also useful to generate XML and JSON.
The template engine of QtWebApp needs some configuration settings which you add to webapp1.ini:
[templates]
path=../docroot
suffix=.html
encoding=UTF-8
cacheSize=1000000
cacheTime=60000
The path is again relative to the folder of the configuration file. This is the folder where we will store the template files - the incomplete HTML files that contain placeholders for variable content.
The suffix will be appended to template names. If you load the template "wolfi", then the template engine loads the file "wolfi.html". You can use any suffix, it has no meaning to the program. Some people prefer ".dhtml" to distinguish between static and dynamic HTML files. Therefore it's configurable.
The encoding paramter is needed because template files are read into QString objects. I prefer UTF-8 because it supports all characters of any language. I also use an UTF-8 capable text editor to edit them (gedit under Linux or Notepad++ under Windows).
To improve performance, the server caches the QString objects. CacheSize specifies the maximum amount of memory that the cache may occupy and cacheTime specifies how long the files are hold in memory at maximum. We had the same settings already for the static file controller.
You get very good performance when you make the cache large enough to keep all template files in memory. But do that only if the server has enough RAM free. Otherwise it may freeze or crash.
The template engine is a separate module in QtWebApp, so you have to add one line to the project file MyFirstWebApp.pro:
include(../QtWebApp/QtWebApp/templateengine/templateengine.pri)
We need a global pointer to a TemplateCache instance, to make it accessible to the whole program. First add to global.h:
#ifndef GLOBAL_H
#define GLOBAL_H

#include "httpsessionstore.h"
#include "staticfilecontroller.h"
#include "templatecache.h"

using namespace stefanfrings;

extern HttpSessionStore* sessionStore;
extern StaticFileController* staticFileController;
extern TemplateCache* templateCache;

#endif // GLOBAL_H
#include "global.h"

HttpSessionStore* sessionStore;
StaticFileController* staticFileController;
TemplateCache* templateCache;
In main.cpp, we configure the instance of the TemplateCache:
int main(int argc, char *argv[])
{
    QCoreApplication app(argc, argv);
    QString configFileName=searchConfigFile();

    // Session store
    QSettings* sessionSettings=new QSettings(configFileName,QSettings::IniFormat,&app);
    sessionSettings->beginGroup("sessions");
    sessionStore=new HttpSessionStore(sessionSettings,&app);

    // Static file controller
    QSettings* fileSettings=new QSettings(configFileName,QSettings::IniFormat,&app);
    fileSettings->beginGroup("files");
    staticFileController=new StaticFileController(fileSettings,&app);

    // Configure template cache
    QSettings* templateSettings=new QSettings(configFileName,QSettings::IniFormat,&app);
    templateSettings->beginGroup("templates");
    templateCache=new TemplateCache(templateSettings,&app);

    // HTTP server
    QSettings* listenerSettings=new QSettings(configFileName,QSettings::IniFormat,&app);
    listenerSettings->beginGroup("listener");
    new HttpListener(listenerSettings,new RequestMapper(&app),&app);

    return app.exec();
}
Now we have a template cache, which automatically loads template files into memory when needed. The next thing that we need is a controller which loads and outputs a template. To get a quick preview, let's simply load the already existing file hello.html.
Create a new class with name DataTemplateController, which is derived from HttpRequestHandler. We will bind it to the path "/list2". You know the procedure already.
datatemplatecontroller.h:
#ifndef DATATEMPLATECONTROLLER_H
#define DATATEMPLATECONTROLLER_H

#include "httprequesthandler.h"

using namespace stefanfrings;

class DataTemplateController: public HttpRequestHandler {
    Q_OBJECT
public:
    DataTemplateController(QObject* parent=0);
    void service(HttpRequest& request, HttpResponse& response);
private:
    QList<QString> list;
};

#endif // DATATEMPLATECONTROLLER_H
datatemplatecontroller.cpp:
#include "datatemplatecontroller.h"
#include "template.h"
#include "global.h"

DataTemplateController::DataTemplateController(QObject* parent)
    : HttpRequestHandler(parent) {
    list.append("Robert");
    list.append("Lisa");
    list.append("Hannah");
    list.append("Ludwig");
    list.append("Miranda");
    list.append("Fracesco");
    list.append("Kim");
    list.append("Jacko");
}

void DataTemplateController::service(HttpRequest &request, HttpResponse &response) {
    QByteArray language=request.getHeader("Accept-Language");
    response.setHeader("Content-Type", "text/html; charset=UTF-8");

    Template t=templateCache->getTemplate("files/hello",language);
    response.write(t.toUtf8(),true);
}
Add to requestmapper.h:
#ifndef REQUESTMAPPER_H
#define REQUESTMAPPER_H

...
#include "datatemplatecontroller.h"

using namespace stefanfrings;

class RequestMapper : public HttpRequestHandler {
    Q_OBJECT
public:
    ...
private:
    ...
    DataTemplateController dataTemplateController;
};

#endif // REQUESTMAPPER_H
Add to requestmapper.cpp:
...
void RequestMapper::service(HttpRequest& request, HttpResponse& response) {
    QByteArray path=request.getPath();
    ...
    else if (path=="/list2") {
        dataTemplateController.service(request, response);
    }
    else if (path.startsWith("/files")) {
        staticFileController->service(request,response);
    }
    ...

    qDebug("RequestMapper: finished request");
}
You can now run and test the program by opening http://localhost:8080/list2. You will see "Hello World!" because that's the content of the template files/hello.html.
Variables
Now lets create a real template file that contains placeholders.
docroot/listdata.html:
<html>
    <body>
        Hello {name}
    </body>
</html>
And replace the service method of datatemplatecontroller.cpp by this one:
void DataTemplateController::service(HttpRequest &request, HttpResponse &response) {
    HttpSession session=sessionStore->getSession(request,response,true);
    QString username=session.get("username").toString();
    QByteArray language=request.getHeader("Accept-Language");
    qDebug("language=%s",qPrintable(language));

    response.setHeader("Content-Type", "text/html; charset=UTF-8");

    Template t=templateCache->getTemplate("listdata",language);
    t.setVariable("name",username.toString());
    response.write(t.toUtf8(),true);
}
First, we fetch the session object of the current user. Then we read out the Accept-Language header which is sent by most web browsers to indicate which language the user prefers.
Then we set a response header to tell the browser that we are going to return a HTML document in UTF-8 encoding.
After we fetched the template file from the cache, we set one variable in it and then write the result to the HTTP response.
Try that program, open http://localhost:8080/list2. You will simply see "Hello". The name is missing because there is no name. The calling user has no session, so the server does not know his name yet.
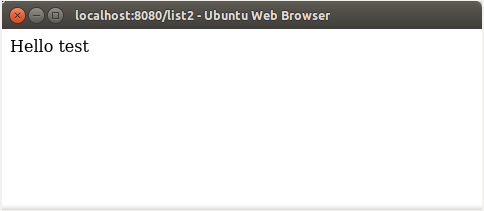
Now login in via http://localhost:8080/login and then call the the template again via http://localhost:8080/list2.
This time, the response says "Hello test". So the variable placeholder {name} was replaced by the value "test" which is the username in the users session.
Conditions
Now lets add a conditional part. We want to distinguish whether the user is logged in or not.
docroot/listdata.html:
<html>
    <body>
        {if logged-in}
            Hello {name}
        {else logged-in}
            You are not logged in.
            <br>
            Go to the <a href="/login">login</a> page and then try again.
        {end logged-in}
    </body>
</html>
We have to add one line to datatemplatecontroller.cpp to set the condition "logged-in":
void DataTemplateController::service(HttpRequest &request, HttpResponse &response) {
    HttpSession session=sessionStore->getSession(request,response,true);
    QString username=session.get("username").toString();
    QByteArray language=request.getHeader("Accept-Language");
    qDebug("language=%s",qPrintable(language));

    response.setHeader("Content-Type", "text/html; charset=UTF-8");

    Template t=templateCache->getTemplate("listdata",language);
    t.setVariable("name",username);
    t.setCondition("logged-in",!username.isEmpty());
    response.write(t.toUtf8(),true);
}
Try that program again, open http://localhost:8080/list2. This time you see:

So click on that link, then log in:


And now open again http://localhost:8080/list2:
You see a different content now, because the condition "logged-in" is now true. Instead of the {if condition} you may also use the reverse counterpart, which is {ifnot condition}.
Loops
The template engine can repeat parts of the website in loops. You need loops when you iterate over a list of data, which we will do now. We have already created a list in the constructor but not used until now.
New lines in docroot/listdata.html:
<html>
    <body>
        ...
        <p>
        List of names:
        <table>
            {loop row}
                <tr>
                    <td>{row.number}</td>
                    <td>{row.name}</td>
                </tr>
            {end row}
        </table>
    </body>
</html>
New lines in datatemplatecontroller.cpp:
void DataTemplateController::service(HttpRequest &request, HttpResponse &response) {
    HttpSession session=sessionStore->getSession(request,response,false);
    QString username=session.get("username").toString();
    QByteArray language=request.getHeader("Accept-Language");
    qDebug("language=%s",qPrintable(language));

    response.setHeader("Content-Type", "text/html; charset=UTF-8");

    Template t=templateCache->getTemplate("listdata",language);
    t.setVariable("name",username);
    t.setCondition("logged-in",!username.isEmpty());
    t.loop("row",list.size());
    for(int i=0; i<list.size(); i++) {
        QString number=QString::number(i);
        QString name=list.at(i);
        t.setVariable("row"+number+".number",number);
        t.setVariable("row"+number+".name",name);
    }
    response.write(t.toUtf8(),true);
}
The template contains a loop around the table row. So that row will be repeated several times. Inside the loop we have the HTML code for one single row. The variable names are prefixed by the name of the loop.
When the template engine repeats that loop 3 times, then we have the following temporary document in memory:
<html>
    <body>
        ...
        <p>
        List of names:
        <table>
                <tr>
                    <td>{row0.number}</td>
                    <td>{row0.name}</td>
                </tr>
                <tr>
                    <td>{row1.number}</td>
                    <td>{row1.name}</td>
                </tr>
                <tr>
                    <td>{row2.number}</td>
                    <td>{row2.name}</td>
                </tr>
        </table>
    </body>
</html>
You see that the {loop row} and {end row} markers have vanished. The table row had been repeated 3 times, and the variable names had been modified with consecutive numbers.
This information should help you to understand the new C++ code lines inside the for() loop:
    for(int i=0; i<list.size(); i++) {
        QString number=QString::number(i);
        QString name=list.at(i);
        t.setVariable("row"+number+".number",number);
        t.setVariable("row"+number+".name",name);
    }
The documentation of the Template class shows a more complex example with two nested loops. And you can do that with any number of levels. However the variable names become somewhat complicated then. I will not show it here because I do not want to bloat the tutorial.
Notice that the Template class distinguishes between the variables {name} and {row.name} properly. The first ist the name of the user while the latter is used in the loop/table.
Run the program and open http://localhost:8080/list2.
Warnings
You can use the method t.enableWarnings(true) to enable warning messages for missing placeholders. For example when the C++ code attempts to set the variable {name} but there is no such placeholder in the template, then this error would normally be silently ignored. But during development, it might be helpful to enable such warnings - or maybe also in production.
Languages
You saw already that we pass the preferred language of the user to the template engine, but we did not really use that feature until now. The related lines of code had been:
    QByteArray language=request.getHeader("Accept-Language");
    qDebug("language=%s",qPrintable(language));
    Template t=templateCache->getTemplate("listdata",language);
The template engine can process several language versions of the same file. Lets add some other languages:
For german, the file listdata-de.html:
<html>
    <body>
        {if logged-in}
            Hallo {name}
        {else logged-in}
            Du bist nicht angemeldet.
            <br>
            Gehe zur <a href="/login">Anmeldeseite</a> und versuche es danach erneut.
        {end logged-in}

        <p>
        Liste der Namen:
        <table>
            {loop row}
                <tr>
                    <td>{row.number}</td>
                    <td>{row.name}</td>
                </tr>
            {end row}
        </table>
    </body>
</html>
For french, the file listdata-fr.html:
<html>
    <body>
        {if logged-in}
            Bonjour {name}
        {else logged-in}
            Vous n'êtes pas connecté.
            <br>
            Accédez à la <a href="/login">page de connexion</a> et réessayez plus tard .
        {end logged-in}

        <p>
        Liste des noms :
        <table>
            {loop row}
                <tr>
                    <td>{row.number}</td>
                    <td>{row.name}</td>
                </tr>
            {end row}
        </table>
    </body>
</html>
Now restart the program and configure your web browser to prefer german websites, then open http://localhost:8080/list2.
You will see the German version of that generated website:

If there is no such file for the preferred language(s), then the template loader falls back to the default file wich has no language suffix (listdata.html in this case). The log messages help you to fix problems if an unexpected language appears.
If you need a more complex template engine with additional features, then take a look at Clearsilver. That's the best one for C/C++ as far as I know.
The file template project: MyFirstWebApp_7.zip
Logging
Until now, we simply wrote all messages to the console window. That's not good for a production environment because you need to look into old log messages, for example from two days ago.
You could simply redirect the output to a file (MyFirstWebApp > logfile.txt) but that has two issues:
- Output redirection is somewhat slow on many systems.
- The logfile would become endless large and you cannot prevent this without stopping the web server for a short period.
So better let the web server itself write all messages to files. That's what the logger modules does.
To include the sources of the logging module to your project, add one line to the project file:
include(../QtWebApp/QtWebApp/logging/logging.pri)
Then add another section to the *.ini file of your program:
[logging]
minLevel=WARNING
bufferSize=100
fileName=../logs/webapp1.log
maxSize=1000000
maxBackups=2
timestampFormat=dd.MM.yyyy hh:mm:ss.zzz
msgFormat={timestamp} {typeNr} {type} {thread} {msg}
Possible log levels are: DEBUG (alias ALL), INFO, WARN or WARNING, CRITICAL (alias ERROR), FATAL. The INFO level has been introduced by Qt 5.5.
The example configuration above enables thread-local buffers that hold back less important messages in memory until a warning or critical error occurs. Then the error message gets written into the log file together with the collected low-level messages. Using the buffer reduces the size of the log file a lot, as long everything works fine. System operators like that.
But the buffer costs noticeable memory and performance. The benefit usually outweights the costs. To disable the buffer, set bufferSize=0. In that case, only messages with the configured minLevel and above are written to the log file.
The logger writes to the console if you do not specify a filename. The path of the log file may be either absolute or relative to the folder of the configuration file. The maxSize parameter limits the size of the logfile (in bytes). When this limit is exceeded, then the logger starts to a new file. The setting maxBackups specifies, how many old logfiles shall be kept on the disk.
I assume you can guess what the timestampFormat settings does. See the documentation of QDateTime::toString() to get an explanation for the characters, there are some more available. The msgFormat setting specifies the format of each message. The following fields are available:
- {timestamp} Date and time of creation
- {typeNr} Type or level of the message in numeric format (0=DEBUG, 4=INFO, 1=WARNING, 2=CRITICAL, 3=FATAL)
- {type} Type or level of the message in string format (DEBUG, INFO, WARNING, CRITICAL, FATAL)
- {thread} ID number of the thread
- {msg} Message text
- {xxx} For any logger variable that you can define yourself
QT 5.0 and newer have some additional variables in debug mode:
- {file} Filename of source code where the message was generated
- {function} Function where the message was generated
- {line} Line number where the message was generated
I am very happy that the Qt developers added these three fields to their framework. I missed them a lot for many years.
You can also use \n to insert a line break and \t to insert a tab character into the message format. All of the variables above can also be used inside the log message, for example:
qCritical("An error occured in {file}: out of disk space");
We need a global pointer to a FileLogger instance, to make it accessible to the whole program. First add to global.h:
#include "httpsessionstore.h"
#include "staticfilecontroller.h"
#include "templatecache.h"
#include "filelogger.h"

using namespace stefanfrings;

/** Storage for session cookies */
extern HttpSessionStore* sessionStore;

/** Controller for static files */
extern StaticFileController* staticFileController;

/** Cache for template files */
extern TemplateCache* templateCache;

/** Redirects log messages to a file */
extern FileLogger* logger;

#endif // GLOBAL_H
#include "global.h"

HttpSessionStore* sessionStore;
StaticFileController* staticFileController;
TemplateCache* templateCache;
FileLogger* logger;
In main.cpp, we configure the instance of the FileLogger:
int main(int argc, char *argv[])
{
    QCoreApplication app(argc, argv);
    QString configFileName=searchConfigFile();

    // Configure logging
    QSettings* logSettings=new QSettings(configFileName,QSettings::IniFormat,&app);
    logSettings->beginGroup("logging");
    logger=new FileLogger(logSettings,10000,&app);
    logger->installMsgHandler();

    // Log the library version
    qDebug("QtWebApp has version %s",getQtWebAppLibVersion());

    // Session store
    QSettings* sessionSettings=new QSettings(configFileName,QSettings::IniFormat,&app);
    sessionSettings->beginGroup("sessions");
    sessionStore=new HttpSessionStore(sessionSettings,&app);

    // Static file controller
    QSettings* fileSettings=new QSettings(configFileName,QSettings::IniFormat,&app);
    fileSettings->beginGroup("files");
    staticFileController=new StaticFileController(fileSettings,&app);

    // Configure template cache
    QSettings* templateSettings=new QSettings(configFileName,QSettings::IniFormat,&app);
    templateSettings->beginGroup("templates");
    templateCache=new TemplateCache(templateSettings,&app);

    // HTTP server
    QSettings* listenerSettings=new QSettings(configFileName,QSettings::IniFormat,&app);
    listenerSettings->beginGroup("listener");
    new HttpListener(listenerSettings,new RequestMapper(&app),&app);

    return app.exec();
}
The number 10000 is a refresh interval in milliseconds, which the logger uses to reload the configuration file. So you can edit any logger setting while the program is running and the changes become effective after some few seconds without needing to restart the server. Use the value 0 if you don't want automatic reloading.
By the way, I gave you an example code which queries and logs the version number of the library. Some few people asked me to add that feature.
Don't forget to create an empty folder MyFirstWebApp/logs. The logger does not create folders itself.
You can now start the application and see what happens. You won't see much because the program has no errors, so the logfile remains empty. But you can see that the output in the console window is reduced to a minimum:

Lets insert a qCritical() message into logincontroller.cpp, then we can see that the log buffer works:
            response.write("<form method='POST' action='/login'>");
            if (!username.isEmpty()) {
                response.write("No, that was wrong!<br><br>");
                qCritical("Login failed!");
            }
            response.write("Please log in:<br>");
Then open the URL http://localhost:8080/login?username=test&password=wrong.
Look again into the logfile - et voilà, there it is:

Now do another test by reducing the minLevel to DEBUG. Save the ini file, wait 10 seconds and after that open the URL http://localhost:8080/hello. Check the logfile again. You can see that now all the debug messages are written out although no error occurred. So changing the log level without program restart works fine.
Logger Variables
Above, I wrote that the logger supports user-defined variables. These variables are thread-local and remain in memory until you clear them. For web applications, it might be useful to log the name of the current user with each message. Lets try that. Add code to requestmapper.cpp to set a logger variable:
void RequestMapper::service(HttpRequest& request, HttpResponse& response) {
    QByteArray path=request.getPath();
    qDebug("RequestMapper: path=%s",path.data());
    HttpSession session=sessionStore->getSession(request,response,false);
    QString username=session.get("username").toString();
    logger->set("currentUser",username);
    ...
}
This way the request mapper queries the name of the calling user for all incoming HTTP requests before passing the request over to the controller classes.
We can now modify the ini file to use that variable:
msgFormat={timestamp} {typeNr} {type} {thread} User:{currentUser} {msg}
Run the program and open the URL http://localhost:8080/login?username=test&password=hello two times. Then check the logfile again:

You can see that the variable {currentUser} is empty until the user logged in. All following requests are then logged with the name of that user.
Note: We put many static resources (logger, sessionStore, staticFileController, templateCache) in the RequestMapper class. In a real life application, I would recommend to create a separate class for example with name "Globals", so everybody knows where to find such resources. Or follow my example in the Demo1 project where I put them in a cpp source file outside any class.
Log Buffers and Thread Pooling
Because threads are re-used for subsequent HTTP requests, the logger may output more details than you are interested in. For example, let's assume that the first successful HTTP request produces some hidden debug messages and then the second request which is handled by the same thread produces an error. Then your log file will contain the error message plus all buffered debug messages. But some of them came from the previous HTTP request, which you don't need.
To clear the buffer between two HTTP requests, add to requestmapper.cpp:
void RequestMapper::service(HttpRequest& request, HttpResponse& response) {
    ...
    else {
        response.setStatus(404,"Not found");
        response.write("The URL is wrong, no such document.");
    }

    qDebug("RequestMapper: finished request");
    logger->clear(true,true);
}
So whenever the processing of a HTTP request has been finished, you clean up the memory of the logger. When the same thread processes the next request, it will start with empty buffers.
The logging project: MyFirstWebApp_8.zip
Dual File Logger
The project contains also a DualFileLogger class which can be used to produce two log files in parallel. This might be useful with the following combination of settings:
-
Primary log file:
- minLevel=INFO
- bufferSize=0
-
Secondary log file:
- minLevel=ERROR (or WARNING)
- bufferSize=100
This way the primary log file does not contain debug messages. But when an error occurs, then the secondary log file contains the error together with up to 100 related debug messages. This file is specially helpful if the problem cause cannot already be identified by the error message itself.
How to setup HTTPS?
You have to install OpenSSL on the server to use HTTPS.
HTTPS does three things:
- Encrypt data in both directions.
- The client verifies the identity of the server.
- The server can optionally verify the identity of the calling client.
All this is based on digital keys and certificates.
Short introduction into certificates
A certificate is like an electronic passport, containing:
- Textual information about the owner (name, address).
- A public encryption key, which fits to the private decryption key of the owner.
- The signature of the authority (CA) which created this certificate.
The authenticity of each certificate can be verified by comparing its digital signature with the certificate of the CA that created the certificate. Our operating systems contain a lot of CA certificates, so they trust all certificates made by these companies automatically.
The private decryption key of the certificate owner is stored in a separate file, which must not be made public. These keys enable a secure one-way communication for secret messages. Since certificates are public, everybody can send secret encrypted messages to the certificate owner. Nobody else can decrypt the message.
Use a server certificate
When you open any HTTPS website, the web server presents his certificate to your web browser. The web browser checks if the name stored in the certificate matches the domain part of the URL. Then the browser checks if the certificate has a valid signature from a known trusted CA. If everything is OK so far, then the browser generates a temporary session key and sends it as a secret message to the server. Only the owner of the certificate can decode this message, other watchers see only garbage. Now the following communication is scrambled by the temporary session key.
To serve the public internet you have to buy an x509 server certificate from a CA company. For local testing you may create your own keys and certificates by the following commands:
# Generate a CA key
openssl genrsa 2048 > ca.key

# Generate a CA certificate
openssl req -new -x509 -nodes -days 365000 -key ca.key -out ca.crt

# Generate a server key and certificate request
openssl req -newkey rsa:2048 -nodes -days 365000 -keyout server.key -out server.req

# Generate a signed server certificate
openssl x509 -req -days 365000 -set_serial 01 -in server.req -out server.crt -CA ca.crt -CAkey ca.key

# Remove temporary files
rm *.req
Add two settings to the configuration file which point to the server certificate and key file.
[listener]
...
port=443
sslKeyFile=ssl/server.key
sslCertFile=ssl/server.crt
The key must be an RSA key in PEM format. The certificate must be an x509 certificate in PEM format.
Web browsers display a warning when they receive a self-made certificate from the server because they do not trust you. To get rid of the warning, install your CA certificate in the settings of the web browser. But this is not acceptable for public websites, there you have to buy an official server certificate.
Use client certificates
In addition to the encryption you can restrict access to only those clients who received a personal certificate from you. In this case you are the CA for those clients, you define whom you trust.
The following commands create a set of certificate and key files for one client, using the self-made CA certificate from above.
# Generate a client key and certificate request
openssl req -newkey rsa:2048 -nodes -days 365000 -keyout client.key -out client.req

# Generate a signed client certificate
openssl x509 -req -days 365000 -set_serial 01 -in client.req -out client.crt  -CA ca.crt -CAkey ca.key

# Combine client key and certificate into one PKCS12 file
openssl pkcs12 -export -in client.crt -inkey client.key -out client.p12 -certfile ca.crt

# Remove temporary files
rm *.req
Install the personal client certificate in the web browser. They do usually require it in PKCS12 format, while most other applications accept a pair of certificate and key file. Add two additional lines to the server configuration:
[listener]
...
caCertFile=ssl/ca.crt
verifyPeer=true
The certificate must be an x509 certificate in PEM format.
Each client gets its own client certificate. All of them must be signed with the same CA certificate that you provide here. If you do not provide it here, then the program would use the CA certificate store of your operating system. I prefer to configure the filename here.
If you want to support both HTTP and HTTPS simultaneously you need two listeners, usually on the public ports 80 and 443, or locally on ports 8080 and 8443.
FAQ
I get a warning: cannot resolve SSLv2_client_method
The Qt libraries output this warning when your openssl library does not support SSL version 2. This protocol version has been disabled because of vulnerabilities. QtWebApp does not depend on it, so you can ignore the warning.
How can I set up a HA cluster?
Put an Apache HTTP Server between your C++ application nodes and the public internet. The mod_proxy module can be used to distribute the load over multiple nodes. The Apache HTTP Server supports sticky sessions, which uses a cookie to route each user always to the same node. Thus you do not need to synchronize session data between the nodes of your cluster. See my example configuration.
Can I run QtWebApp on embedded ARM systems?
Yes, on all platforms that are supported by Qt. I tried it successfully on an Android 4.1 phone and I got positive feedback for the Raspberry Pi and Odroid. However, I have no idea how to install a daemon on Android without rooting it.
Is it safe to kill the program?
That depends on what your program does. The whole QtWebApp library and all demo applications can be killed safely at any time. They do not need any code that catches the kill event. But if you write a more complex application, your business logic might require that.
Does QtWebApp support something like JSP?
No it doesn't and I will never ever develop that.
Why is there no request mapping file like web.xml?
Because all that stuff around mapping and filtering can be easily developed with some few lines of code in the RequestMapper.
Does QtWebApp support AJAX?
Yes, of course. You don't need any special class or method for that on the server side. And for the client side, there are a lot of Javascript libraries available. The example Javascript code in the Wikipedia article may be used as well.
How can I use HTML5 SSE (Server-Sent-Events)?
You need to write a special request handler that runs in an endless loop to keep the connection open. Within that loop you can send events to the browser by calling HttpResponse::write() and HttpResponse::flush().
See this example from 樊龙涛 and the explanations in the Book High Performance Browser Networking from Ilya Grigorik, Chapter 16 (Server-Sent Events).
I do not recommend to use SSE because it keeps an IP socket open all the time. The number of connections is a limited resource on the operating system and network components. Open connections do also draw a lot energy from the battery of mobile devices.
Can I use WebSockets?
No, because QtWebApp contains only a HTTP server. WebSocket is a different protocol which I did not implement.
I do not recommend to use WebSockets for the same reason as for SSE.
How to prevent crash during shutdown?
When you encounter a segmentation fault sporadically at shutdown, you should check the deletion order of objects. The automatic clean-up procedure of Qt (via parent ownership) tends to delete objects in the wrong order.
You have to close or delete the listener before any other other object that is used by the listener (e.g. the request handler).
Note that console applications are usually closed instantly by the operating system when you press Ctrl-C or close the console window. The destructors are not called in that case.
Issue with relative path
Most web servers return the file index.html by default, if the requested URL ends with a folder name. I recommend to follow this pattern in your program as well.
There is not a problem as long the URL ends with "/". But if the user also omits the trailing slash then the browser handles relative path names inside the website wrongly. Example:
- The full URL would be http://stefanfrings.de/klimbim/index.html
- But the user enters http://stefanfrings.de/klimbim
- The website contains an image with relative path: images/logo.png.
- The browser attempts to load http://stefanfrings.de/images/logo.png, but it should be
http://stefanfrings.de
/klimbim/images/logo.png
The easiest solution is to redirect the browser to the index.html if the path ends with a folder name:
if (path.endsWith("/klimbim") || path.endsWith("/klimbim/"))
{
   // redirect to the correct path and file
   response.setStatus(301,"Moved Permanently");
   response.setHeader("Location","/klimbim/index.html");
}
Then the browser will load resources with relative path properly.